WorkStep HIRE offers a collaborative calendar feature, called Interview Calendar. From this area, Administrators and Editors can create multiple calendars for different hiring flows. Depending on the interview type and what the first step is in your hiring process, these calendars can be used to schedule a phone interview, a video interview, or an in-person interview. When creating the calendars, administrators also provide different hiring managers access to different open roles and their associated calendars. The assigned hiring manager can then configure availability for interviewing by creating interview slots.
Once a calendar is completely configured (including with interview slots), managers can invite candidates to independently schedule their upcoming interviews based on those configurations. When a candidate is invited to interview through the review flow on WorkStep, the candidate immediately receives an automatic message with details to access the interview calendar and schedule a slot.
How It Works
From the Interview Calendar:
- Administrators create a calendar.
- Administrators assign relevant roles to the calendar.
- Hiring managers can add interview slots to the relevant calendar based on their availability. Adding interview slots to your calendar allows candidates to select a time for their interview from your available slots. An interview slot added to your “Next Week” calendar will be a recurring interview slot so you don’t need to update your calendar each week.
Create and Assign Calendars
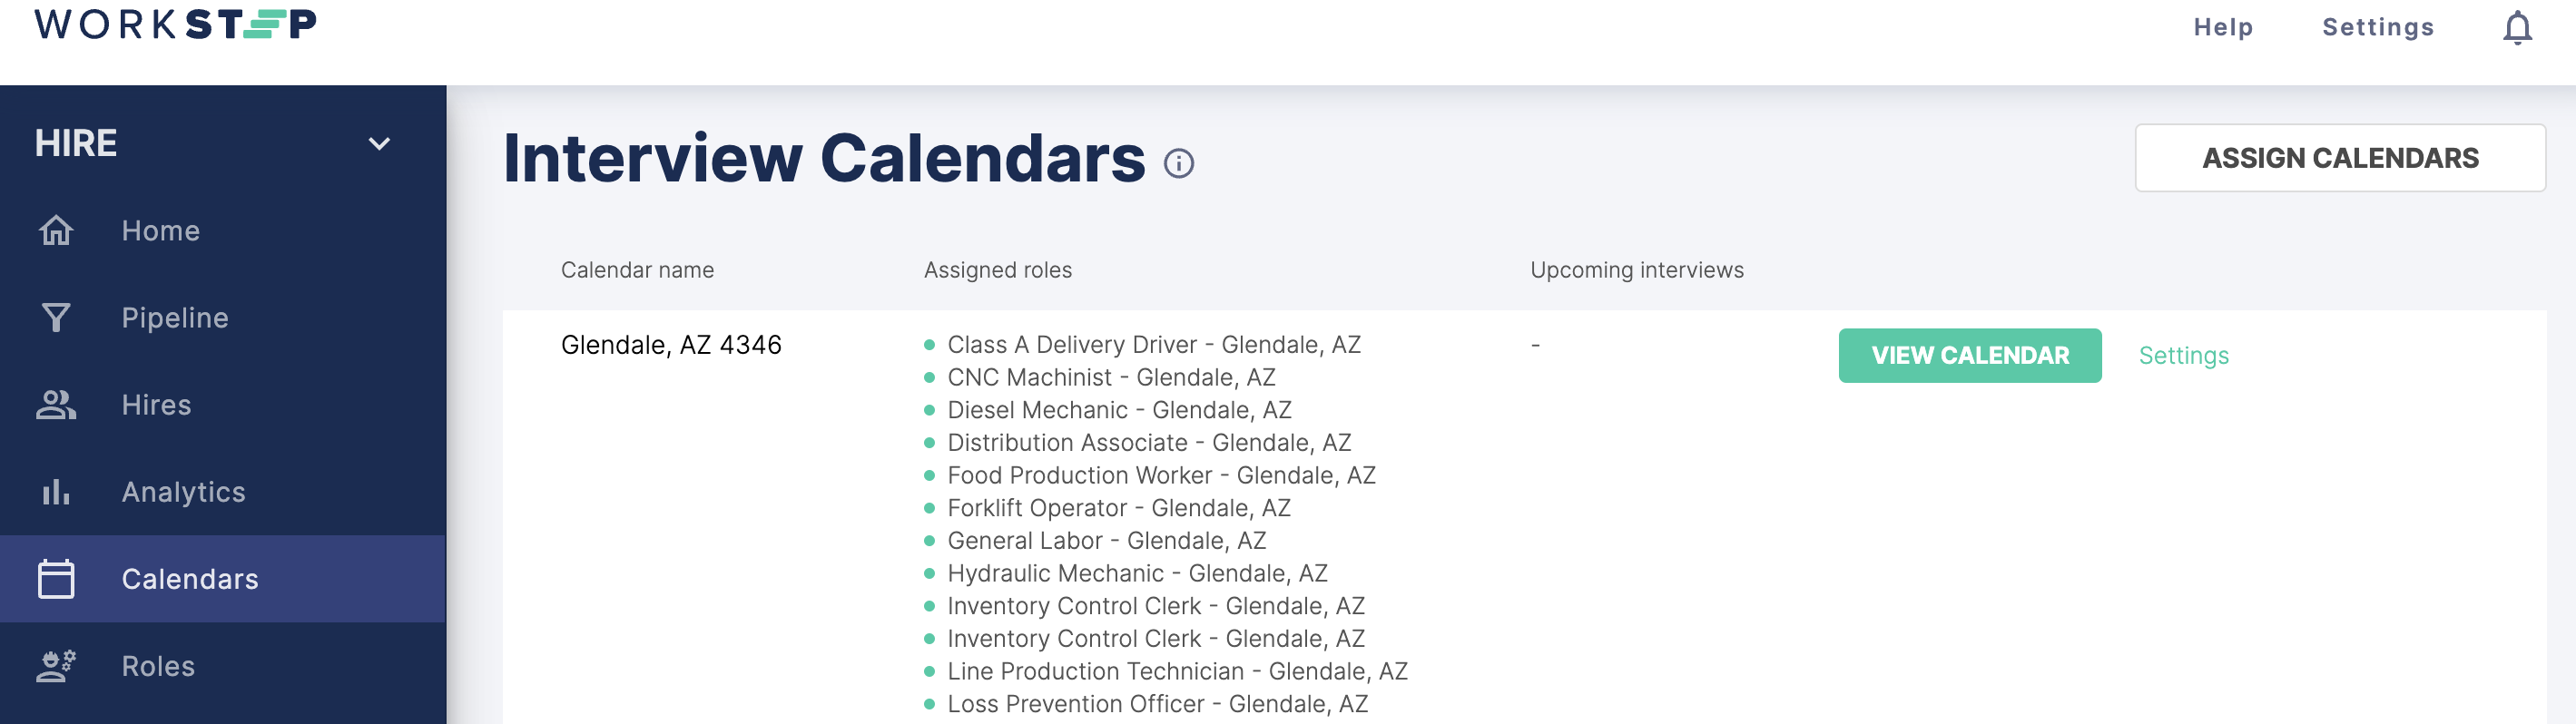
To enable hiring managers to access and manage their available interview slots, first create calendars for different hiring flows and the relevant open positions.
An open position or a group of open positions for the same job type are called a Role in WorkStep. Each role can only be assigned to one interview calendar. Each calendar can have multiple roles assigned to it. Only roles that share the same interview availability, the same interviewer and the same hiring step should be assigned to the same calendar.
How to create and assign calendars
Prerequisites: Create roles for which you’re hiring and if you aren’t the hiring manager, then assign hiring managers to the relevant roles.
- From the navigation panel, click Interview Calendars to access all calendars and settings.
- Click Create a new calendar located at the bottom of the page.
Note: For your first calendar, the link may appear in a different location.
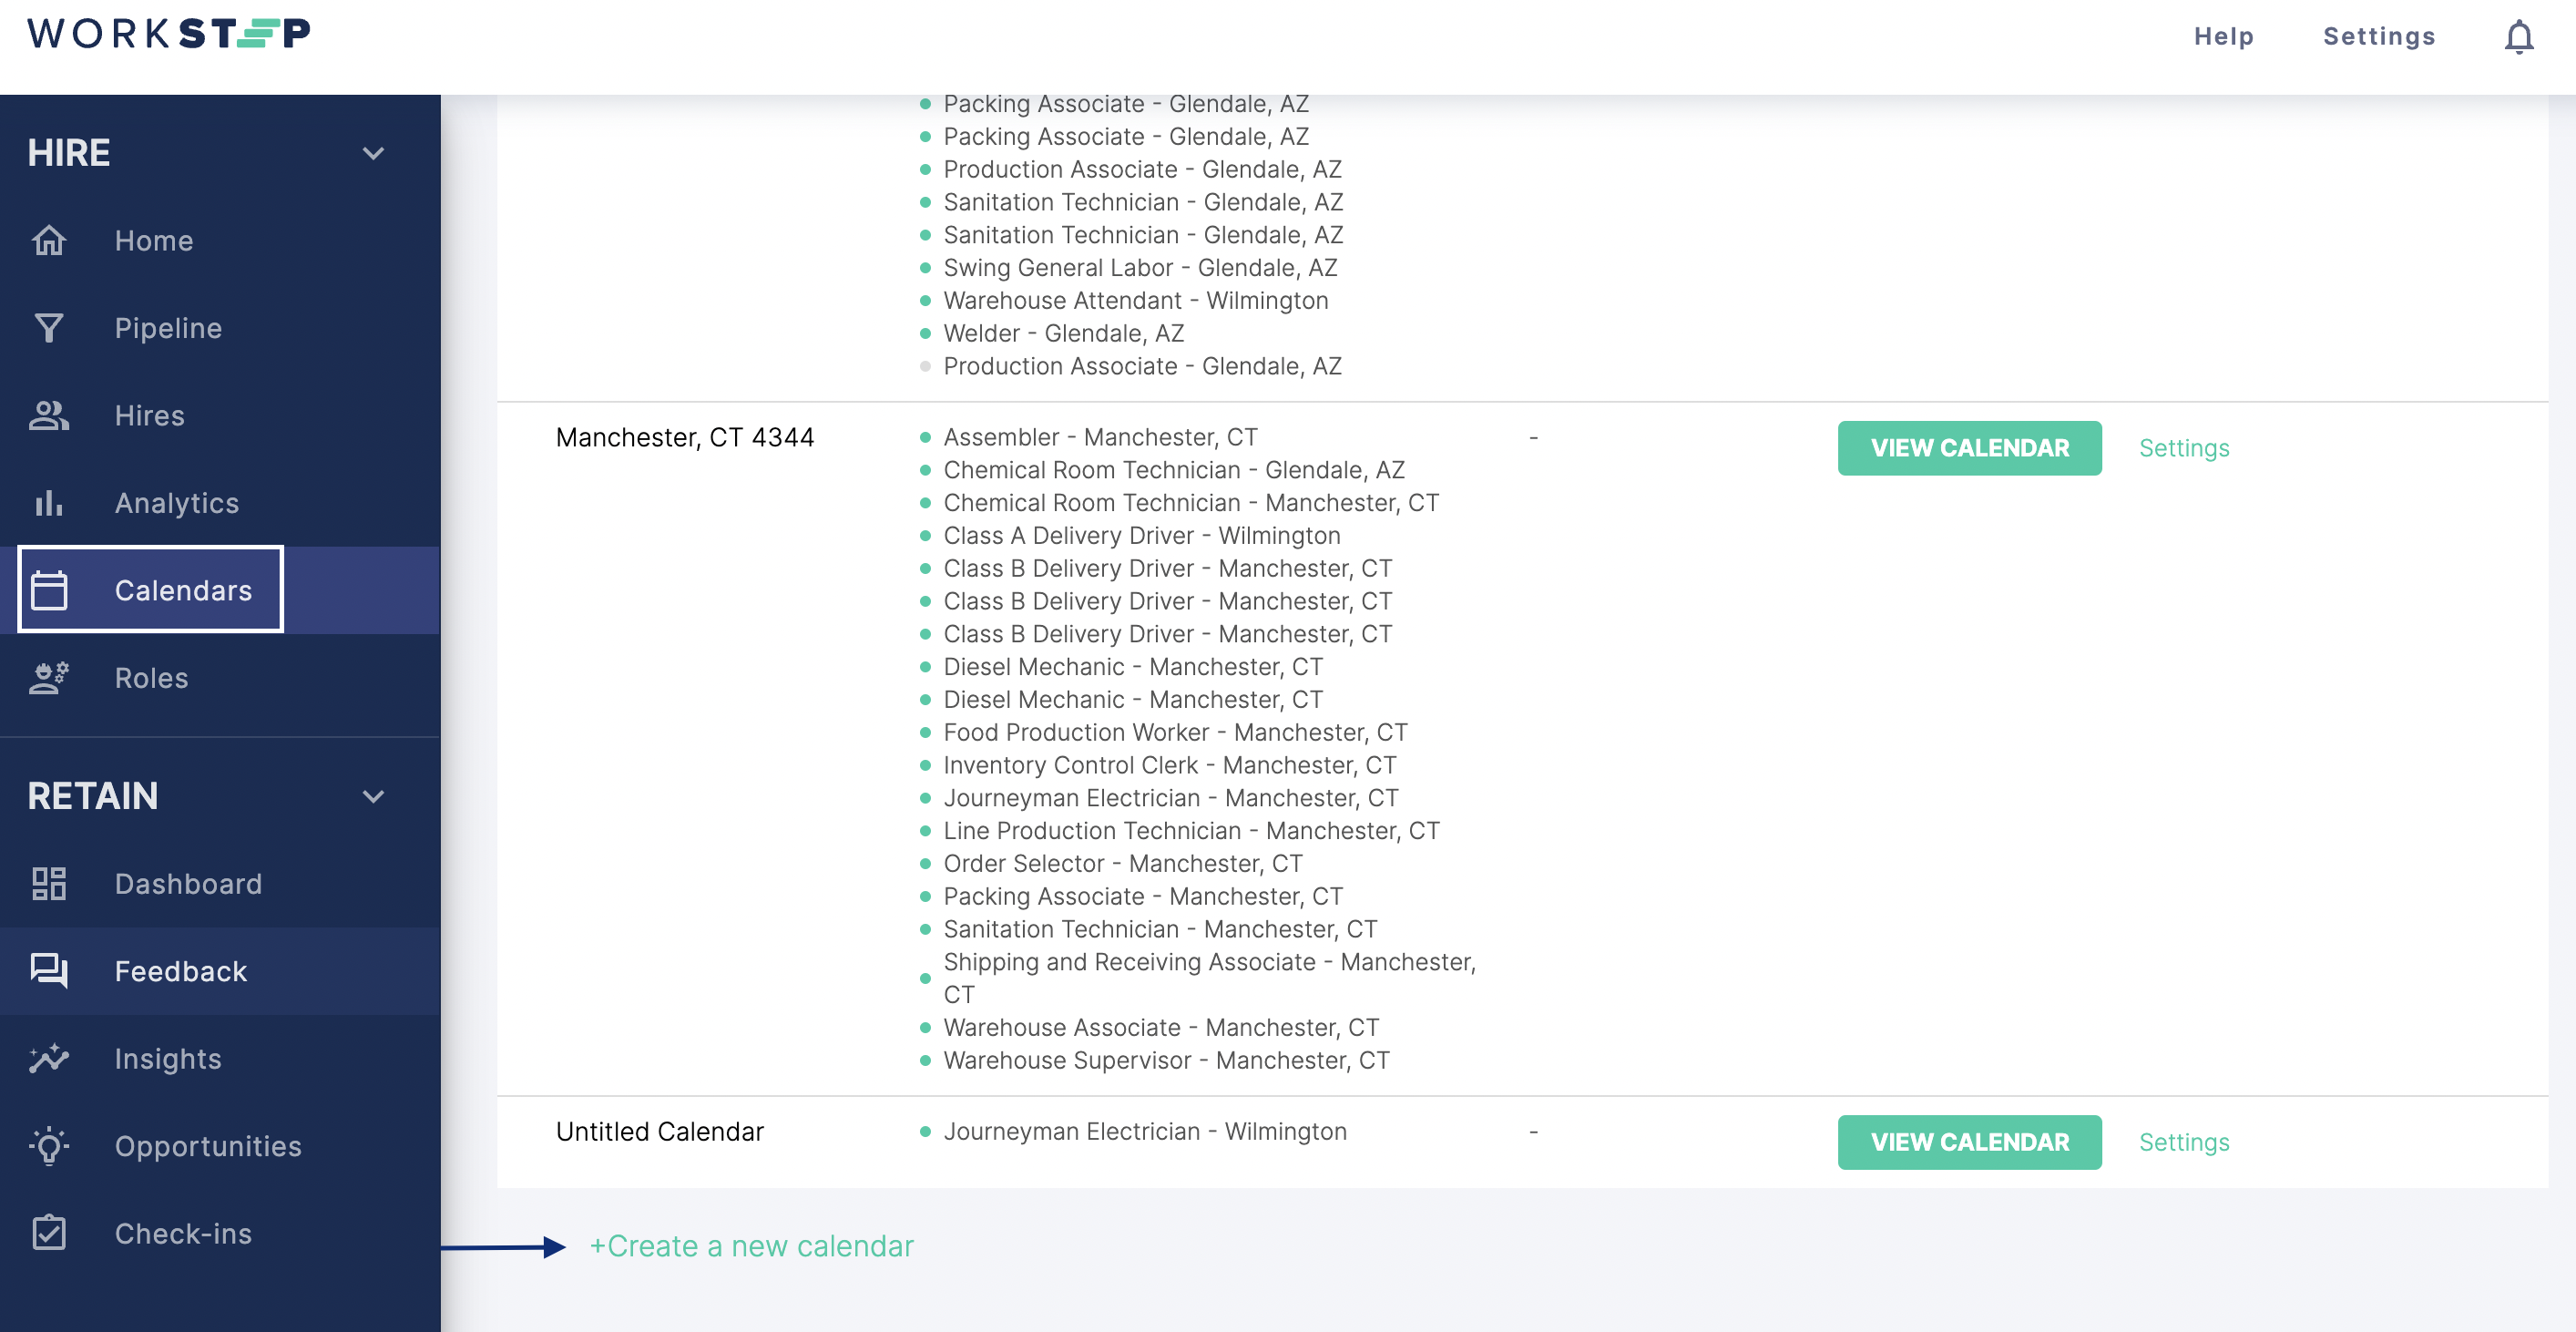
- Click in the title area, initially called "Untitled Calendar", and give a relevant distinct name to the calendar.
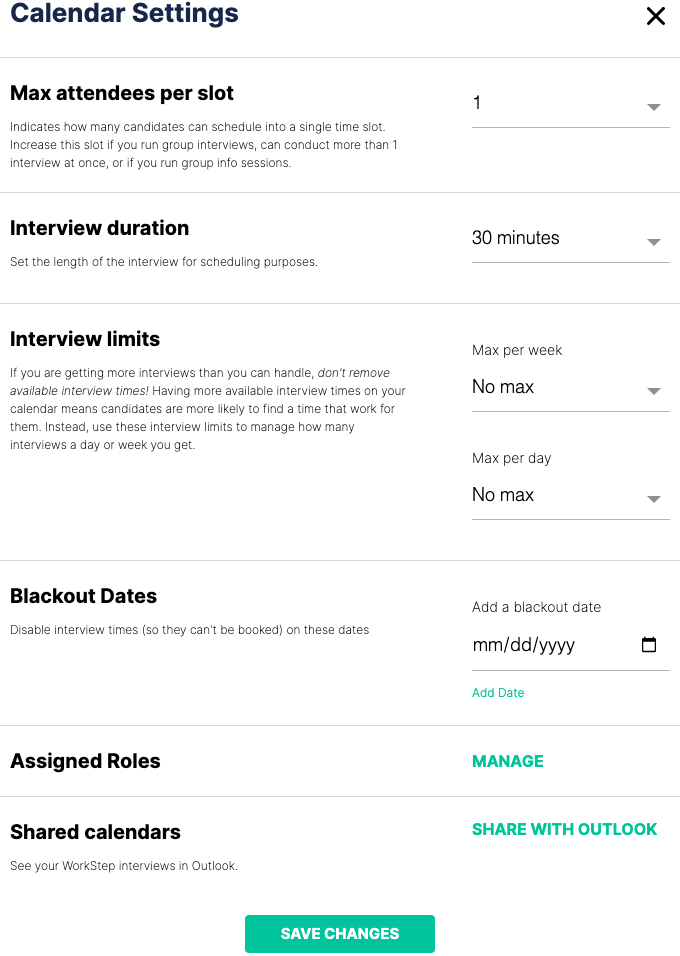
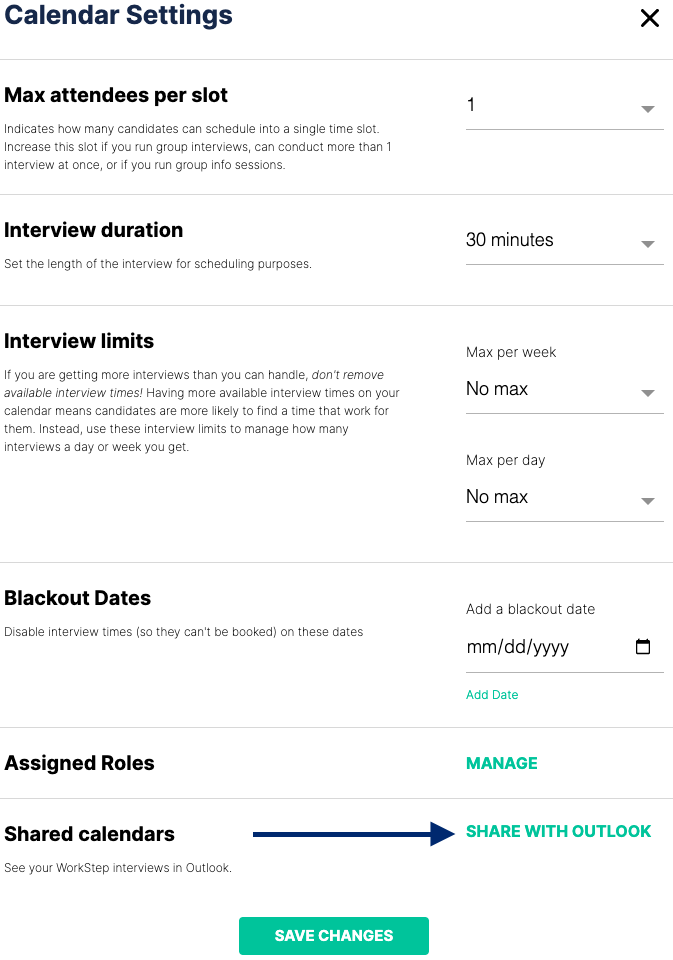
- Click Calendar Settings to configure the calendar.
|
Parameter |
Description |
|
Max attendees per slot |
Max attendees per slot allow more than 1 candidate to schedule an interview for the same slot. When the maximum number of candidates schedule an interview time, their names appear in that slot and the slot is no longer available for scheduling. |
|
Interview duration |
Set the length of the interview for the hiring step associated with this calendar. By default, all interview slots are set for 30 minutes. |
|
Interview limits |
If you have a lot of interview availability added on your calendar and you’re receiving significant candidate volume, it’s best to continue to make many time slots available, and to support volume limitations with Interview limits. Indicate the maximum number of interviews to be scheduled in any given day or week before the remaining times are blocked off from the candidate view. This helps you keep that wide-ranging availability while still maintaining control of your calendar. |
|
Blackout Dates |
Indicate specific one-time dates in the future that you’ll be out of the office or unavailable for interviews, rather than adjusting your recurring availability. Dates that are blacked out are no longer visible or available to candidates for scheduling. |
|
Assigned Roles |
Opens the Manage Calendar Assignments pop-up window from which you can choose the relevant open positions for which to manage interview scheduling through this and other calendars. See Manage Calendar Assignments for more help. |
|
Shared calendars |
Share with your Outlook to view scheduling directly from your personal calendar. When you click the link, an email invite is sent from which you can complete the calendar share process. |
- Once you’ve completed the calendar settings, click Save Changes.
- The next step you'll want to take is adding roles to the calendar.
Assign Roles to a Calendar
Once you’ve created calendars for different hiring flows, assign the open roles (the positions for which you’re hiring) to those calendars. You can also access this area at any time to continue making modifications and updates to the role assignments.
Prerequisites: Create roles for which you’re hiring and assign hiring managers to the relevant roles.
- From the navigation panel, click Interview Calendars to access all calendars and settings.
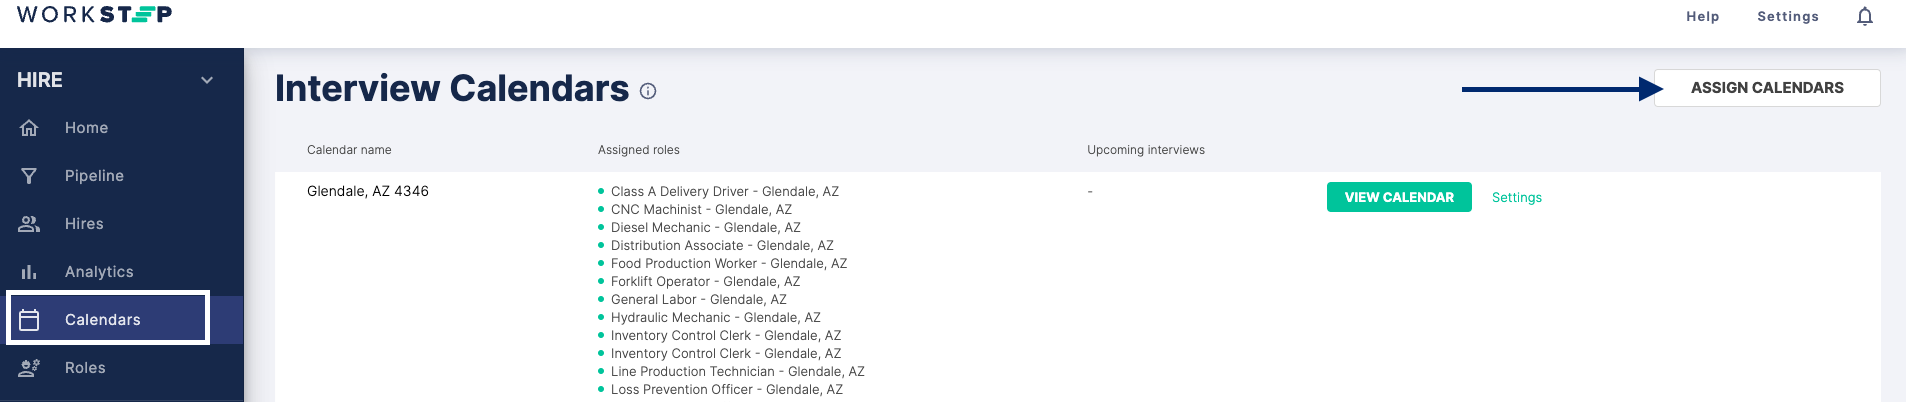
- From the top right, click Assign Calendars.
The following "Manage Calendar Assignments" window will appear. This view lists all roles that you’re hiring, the locations at which the roles are available and the calendars through which their interviews can be scheduled.
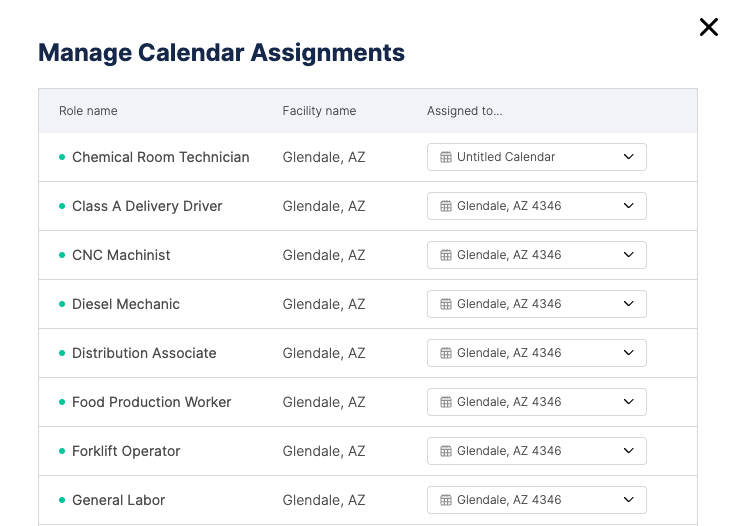
- For each of the roles, select the calendar through which interviews for the role can be scheduled from the 'Assigned to' column. Assign additional roles in the list to the same calendar only if they share the same interview availability, the same interviewer and the same hiring step.
- Click Save Changes to close the window and save the assignments.
- The next step you'll want to take is adding interview slots to the calendar.
Add Interview Slots
Once you’ve created calendars for different hiring flows and assigned the relevant roles, hiring managers can start adding interview slots.
Prerequisites: Create and assign calendars for which you’re hiring, assign roles to the calendar and assign hiring managers to the relevant roles.
- From the navigation panel, click Interview Calendars to access all calendars and settings.

- Scroll through the list of roles to find the relevant one.
- Click View Calendar
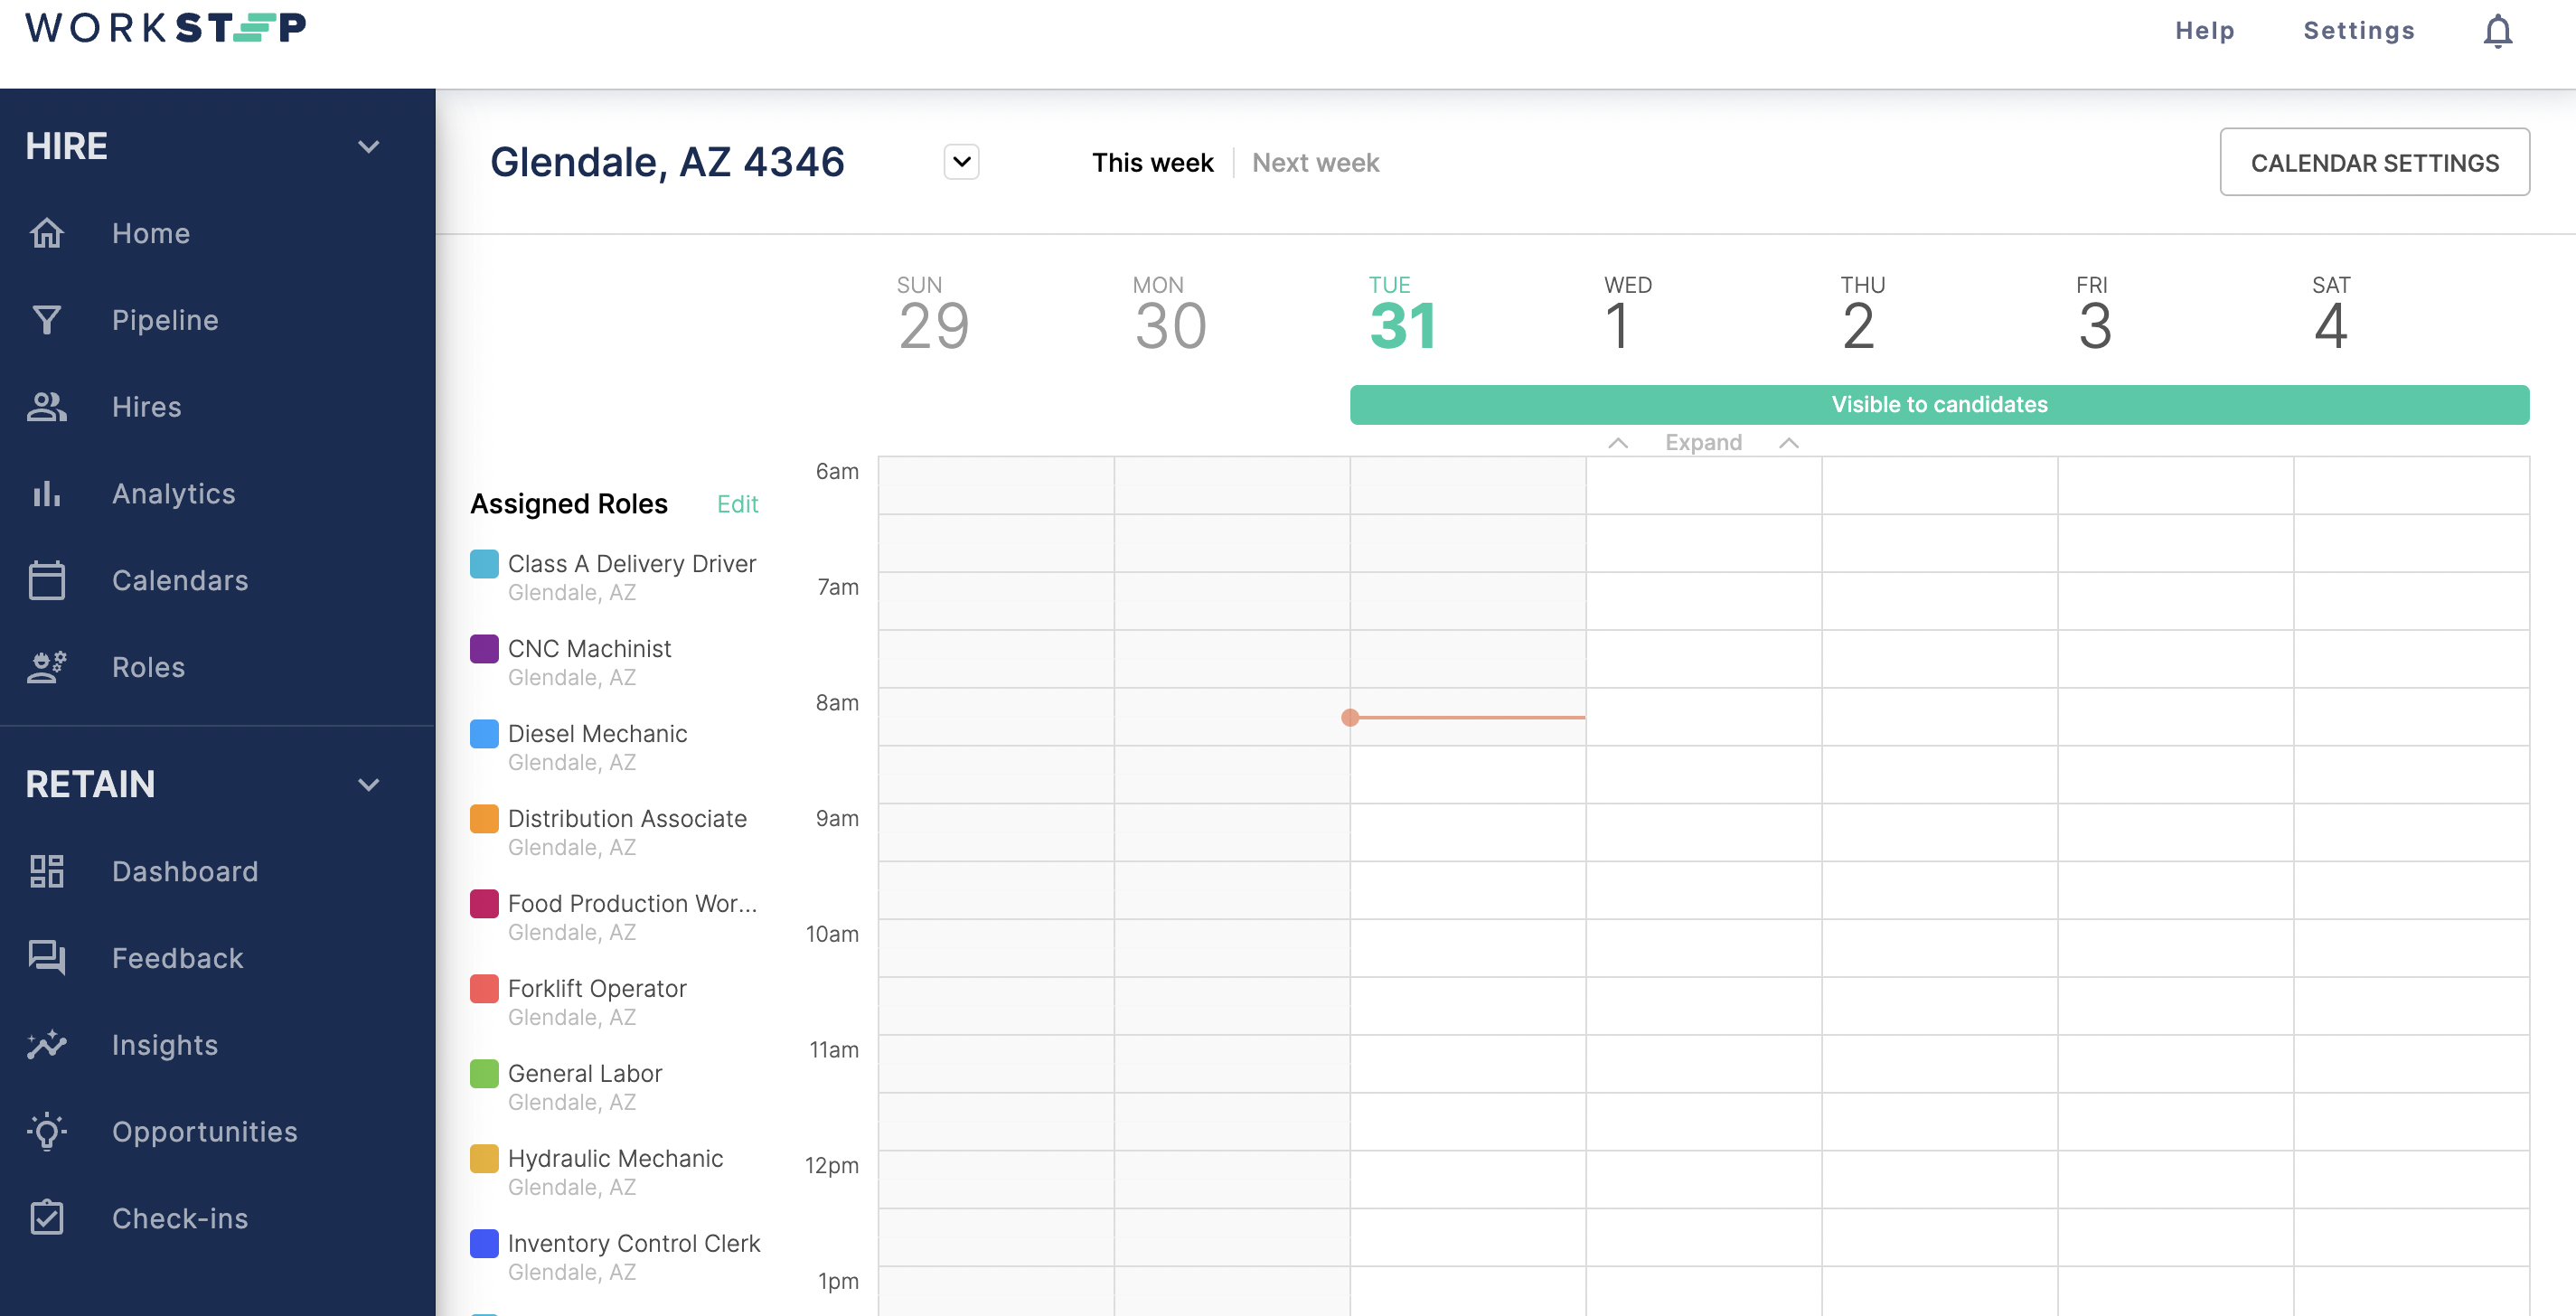
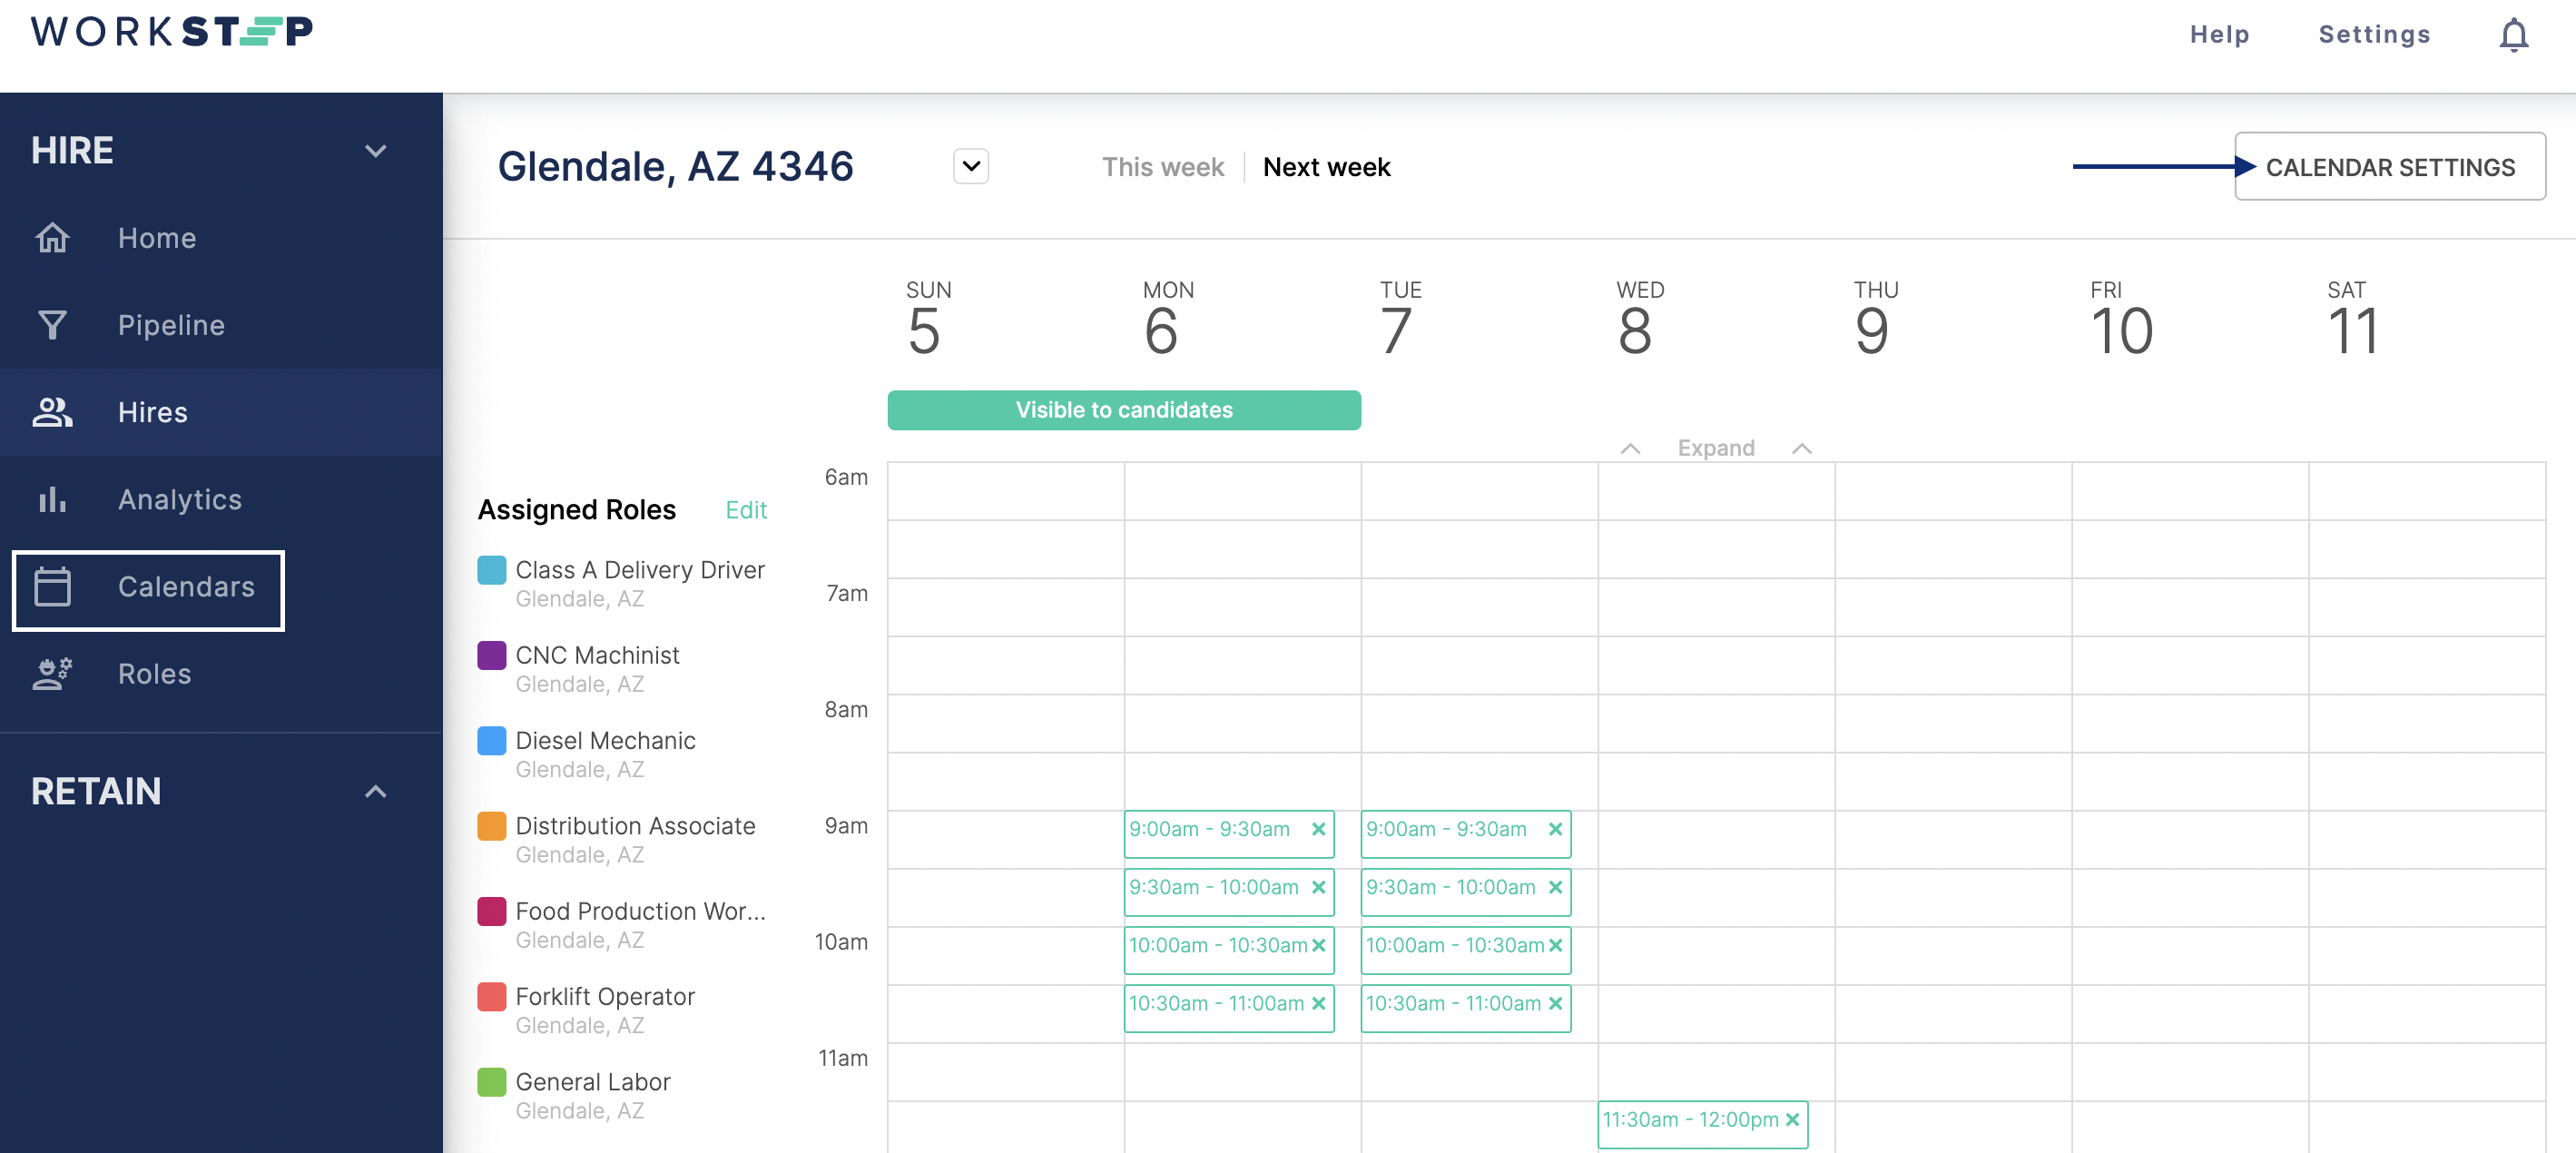
- From the top of the page, click Next Week to toggle to the next week's view of the calendar.
Slots that appear in the next week view are recurring slots, representing availability on a rolling basis.
The times for the “next week” are the times you configured that recur week after week. Candidates can only see 7 days forward at any given point in time to help facilitate a healthy interview schedule and attendance rate. In our experience, scheduling more than 7 days in advance tends to increase the likeliness of reschedules or cancelations. This also allows you to make changes to the recurring time slots without creating any conflicts with the times your candidates have already scheduled. - To add an interview slot, click any calendar cell. The Add new interview slot window will appear to confirm you date/time.
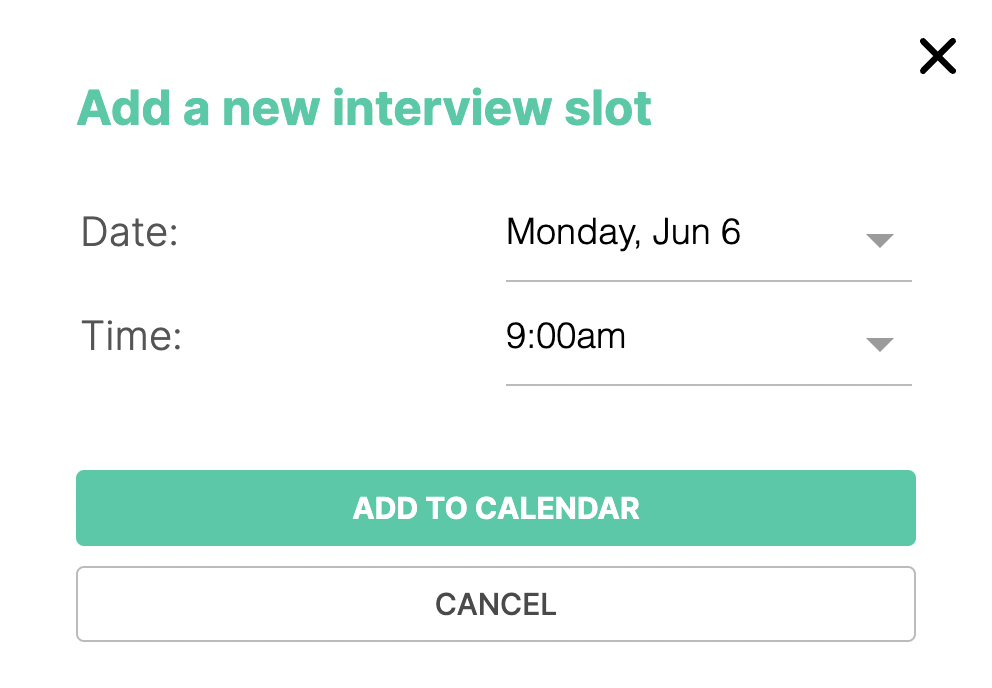
- From the pop-up window, select the date and time for the new interview slot you’d like to add.
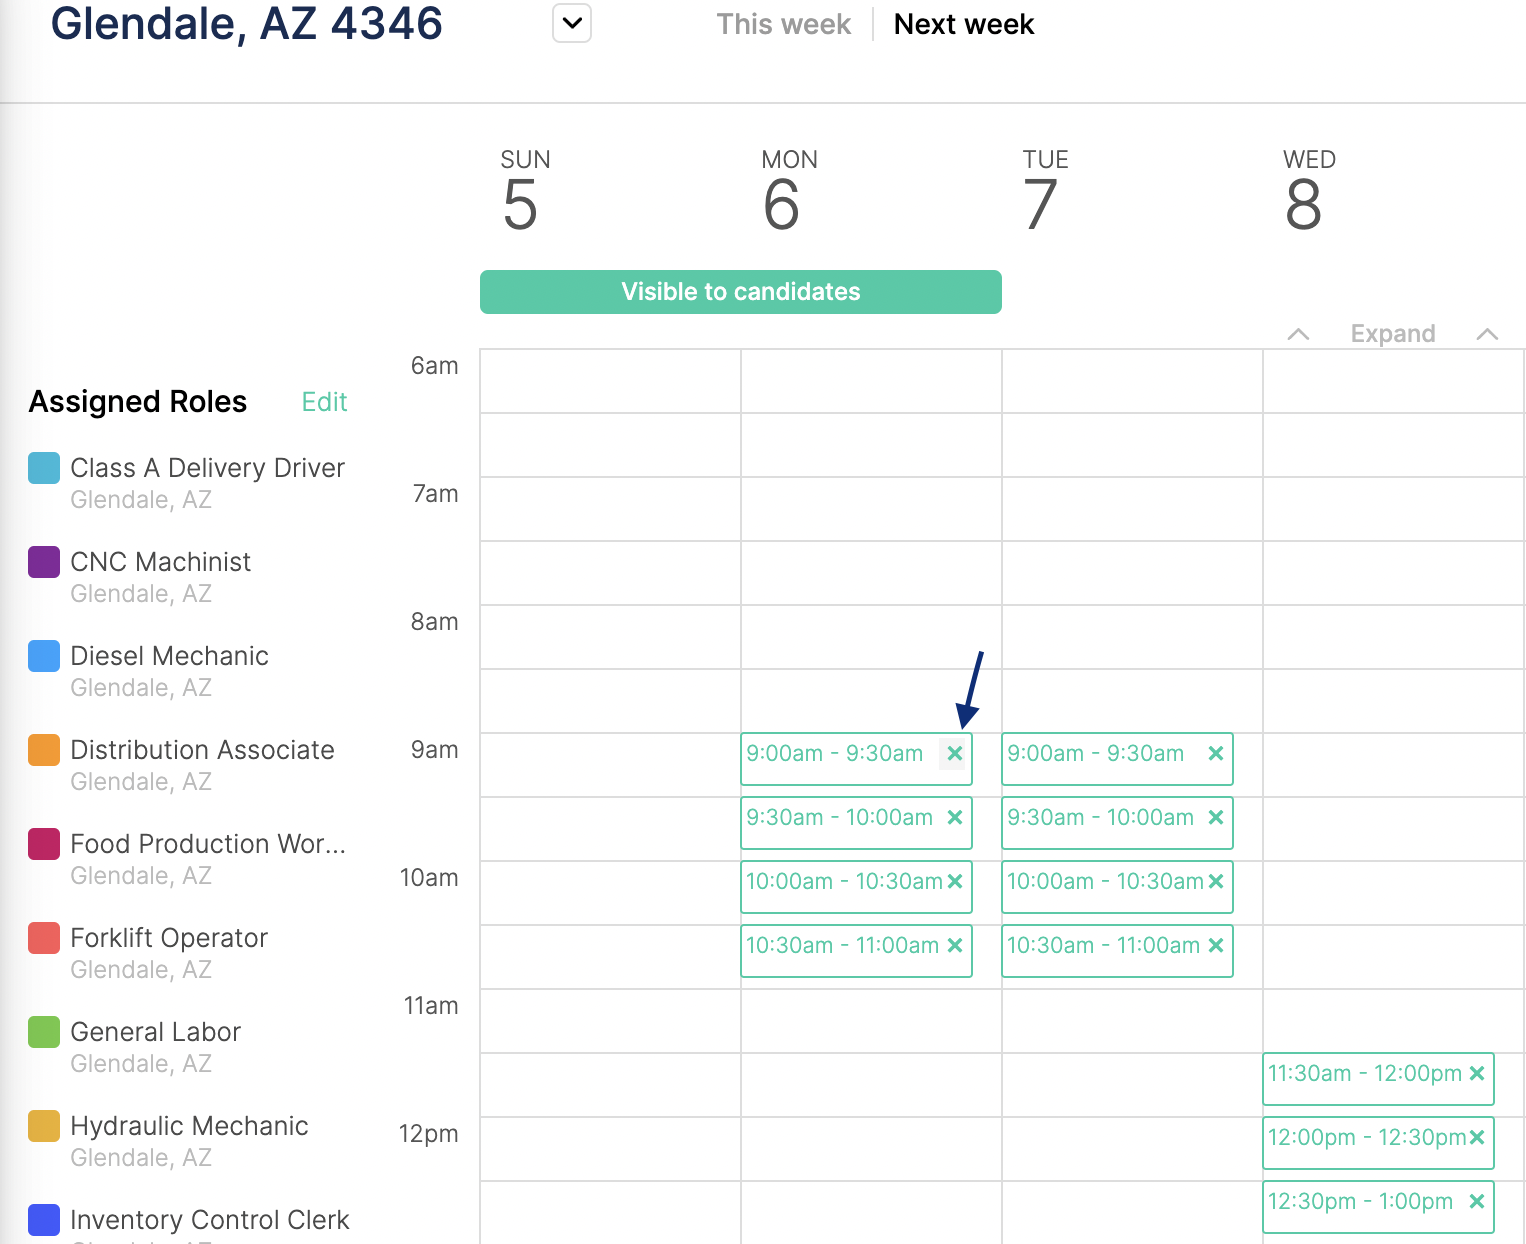
To ensure that you have sufficient availability for candidates, we recommend that you have a variety of available times on different days and that you schedule a 5:1 interview ratio, with five slots available for every position that you’re hiring for.
This means that if you’re looking to fill one opening, configure AT LEAST 5 interview slots on your calendar with a variety of times. The more openings you’re looking to fill, the more availability you’ll want to add. - To add a chunk of time, select the starting time slot, hold your mouse down, drag through to the ending time slot and then release the mouse.
- To delete a slot, click the ‘x’ for that time slot.
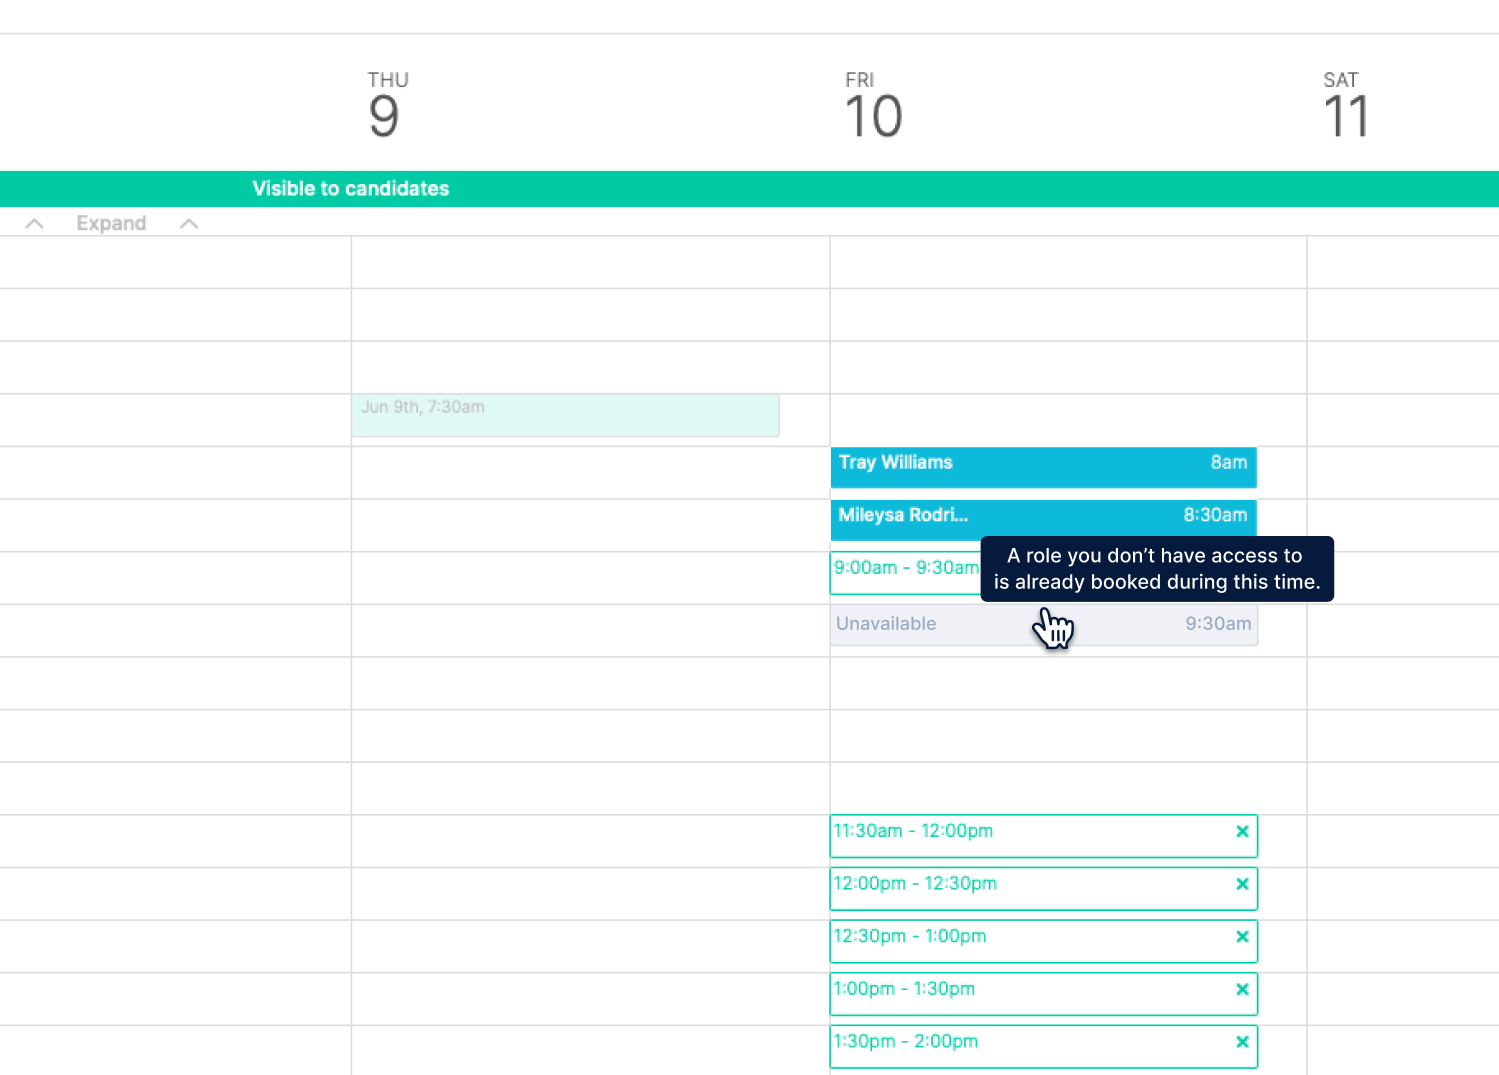
In the below example, the user is trying to add availability on their calendar to interview for their role. However, the time slot they want to add is blocked by the availability of another user that does not share the same role permissions.
For this reason, we do not recommend adding roles to a calendar that do not have similar or identical interview availability, or users with varying role permissions.


View Scheduling from Your Outlook Account
You can share your interview calendar with your Outlook calendar in order to conveniently view scheduling alongside your other calendar appointments.
How to share your interview calendars with your Outlook
- From the navigation panel, click Interview Calendars to access all calendars and settings.
- Scroll through the list of calendars to find the relevant one.
- Click View Calendar
- Click Calendar Settings
- Scroll to the last option in the Calendar Settings display to find the Shared calendars option:
- Click Share with Outlook.
When a green checkmark appears next to Share with Outlook and the link is no longer active, an email invite has been sent directly to your email for the specific calendar.
The email contains a link and instructions for sharing the calendar with Outlook.
WorkStep does not directly support Outlook products. WorkStep's Outlook sync may not be compatible with certain versions of Outlook. Please reach out to your IT team for help with determining sync issues or existing settings that may be preventing a successful sync.
Calendar FAQ
- Q: How do I set the timezone for my calendar? A: The WorkStep system will always display the calendar view in the timezone set on your device, regardless of which calendar you are viewing. Note, the calendar will tell you what timezone is being used at the bottom of the calendar page.